AUTOMATIC WHEAT/CROP FARM
A semi-automatic crop farm using a water flush system. A dispenser releases water across the farmland, breaking all mature crops. Items flow to a collection point with hoppers.
Materials List
Overview: what the Automatic Wheat/Crop Farm is and does
A semi-automatic crop farm using a water flush system. A dispenser releases water across the farmland, breaking all mature crops. Items flow to a collection point with hoppers.
As a farm it automates a resource loop — detecting growth or spawns and harvesting them — so the materials accumulate while you are away. It is a beginner-friendly build: the wiring is forgiving and a first-time redstoner can finish it in one sitting.
It fits in roughly 9W x 9L x 2H and works in Minecraft 1.5+ through to the current 1.21 release.
How it works: the redstone mechanics
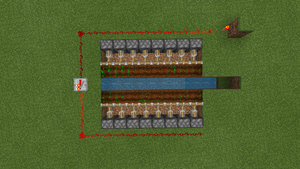
A dispenser loaded with a water bucket is the harvester here: pressing the button releases a water sheet that flows across the farmland and pops every mature crop as a drop, then a second press sucks the water back. The drops ride the flow into a collection trench feeding a hopper and chest.
The core parts doing the work are dispenser, water Bucket, redstone Dust, stone Button, and hopper; the remaining materials are structure and wiring that hold those pieces in the right relationship.
Because it is a farm, throughput depends on how often the resource grows or spawns, so leaving it loaded (within render or simulation distance) is what actually fills the chests.
How to build it
- 1Build a flat farmland area (9x9 max with center water source).
- 2Hoe the dirt into farmland and plant your crops.
- 3At one end, place a dispenser facing across the farm with a water bucket inside.
- 4At the opposite end, build a collection trench with water flowing toward a hopper.
- 5Wire the dispenser to a button.
- 6Press the button to release water, it washes across and breaks mature crops.
- 7Press again to retract the water (dispenser collects it back).
- 8Items flow through the trench to the hopper and into the chest.
Uses & applications
- ▸As a farm it automates a resource loop — detecting growth or spawns and harvesting them — so the materials accumulate while you are away.
- ▸Built from 1× dispenser, 1× water Bucket, 4× redstone Dust, and 1× stone Button and more, it slots into a survival base as a beginner-level project.
- ▸Pair it with an automatic storage or sorting system so the harvested items file themselves away.
- ▸Run several copies side by side — most farm designs here are tileable — to multiply output.
Tips & common mistakes
- !Crops only break when fully grown, so a too-frequent flush wastes the cycle — trigger it only once the field has actually matured.
- !Test the full cycle in a creative-mode copy first, then rebuild it in survival once you know the timing holds.
- !Remember a powered hopper is locked, not active — keep stray redstone away from the hopper lines unless you deliberately want to gate item flow.
Automatic Wheat/Crop Farm FAQ
How do you build an Automatic Wheat/Crop Farm in Minecraft?
Build a flat farmland area (9x9 max with center water source). Hoe the dirt into farmland and plant your crops. The full build takes 7 material types and fits in about 9W x 9L x 2H.
What materials does an Automatic Wheat/Crop Farm need?
The main materials are 1× dispenser, 1× water Bucket, 4× redstone Dust, and 1× stone Button, plus the remaining structural and wiring blocks.
How hard is the Automatic Wheat/Crop Farm to build?
It is a beginner-friendly build: the wiring is forgiving and a first-time redstoner can finish it in one sitting. It is compatible with Minecraft 1.5+ and later.
How does the Automatic Wheat/Crop Farm actually work?
A dispenser loaded with a water bucket is the harvester here: pressing the button releases a water sheet that flows across the farmland and pops every mature crop as a drop, then a second press sucks the water back. The drops ride the flow into a collection trench feeding a hopper and chest.